If you've built a workflow or two in n8n, you've probably run them by clicking a button. That's fine for testing — but real automations need to fire on their own, the moment something happens somewhere else. A new form submission. A payment. A message. A button on your website.
New to n8n? Start with the complete beginner's guide — every concept explained once, with the whiteboard diagrams, then come back here.
The thing that makes that possible is a webhook, and once it clicks, it changes how you think about automation entirely. A webhook turns your workflow into a live endpoint on the internet that any other app can poke to say "hey, this just happened — go do your thing." It's the single most useful trigger in n8n, and it's completely free on a self-hosted setup.
Let's demystify it and build a working one.
What a webhook actually is (in plain English)
Imagine your workflow has a doorbell. A webhook is that doorbell: a unique web address (a URL) that sits and waits. When any app sends a request to that URL, the doorbell rings and your workflow starts — instantly, with whatever data the app sent along.
That's the whole idea. Instead of you starting the workflow, something else does, by calling a URL. Stripe can ring it when you get paid. Typeform can ring it when someone fills your form. Another n8n workflow can ring it. Even a button on your own site.
Compared with the other way to get data — polling, where your workflow wakes up every few minutes and asks "anything new yet?" — webhooks are instant and efficient. The event pushes to you the moment it happens.
Why self-hosted n8n is perfect for webhooks
On free, self-hosted n8n, webhook triggers are unlimited — no cap on how many times they fire, no per-execution cost. Your n8n gives each webhook two URLs: a test URL (for building and trying it out) and a production URL (for when it's live). We'll use the test URL to see it work end to end.
If you haven't set up free n8n yet, it's one Docker command — see the self-host n8n for free guide first, then come back here.
Step 1: Add a Webhook trigger
Start a new workflow and add a Webhook node as the trigger (it replaces the usual "Manual Trigger"). It has a few key settings:
- HTTP Method — usually
GET(a simple visit) orPOST(when data is sent in the body). Start withGET. - Path — the unique part of your URL. Call it something like
demo-hook. Your full test URL becomes something likehttp://localhost:5678/webhook-test/demo-hook. - Respond — what the caller gets back. "Last node" sends back whatever your final node produces.
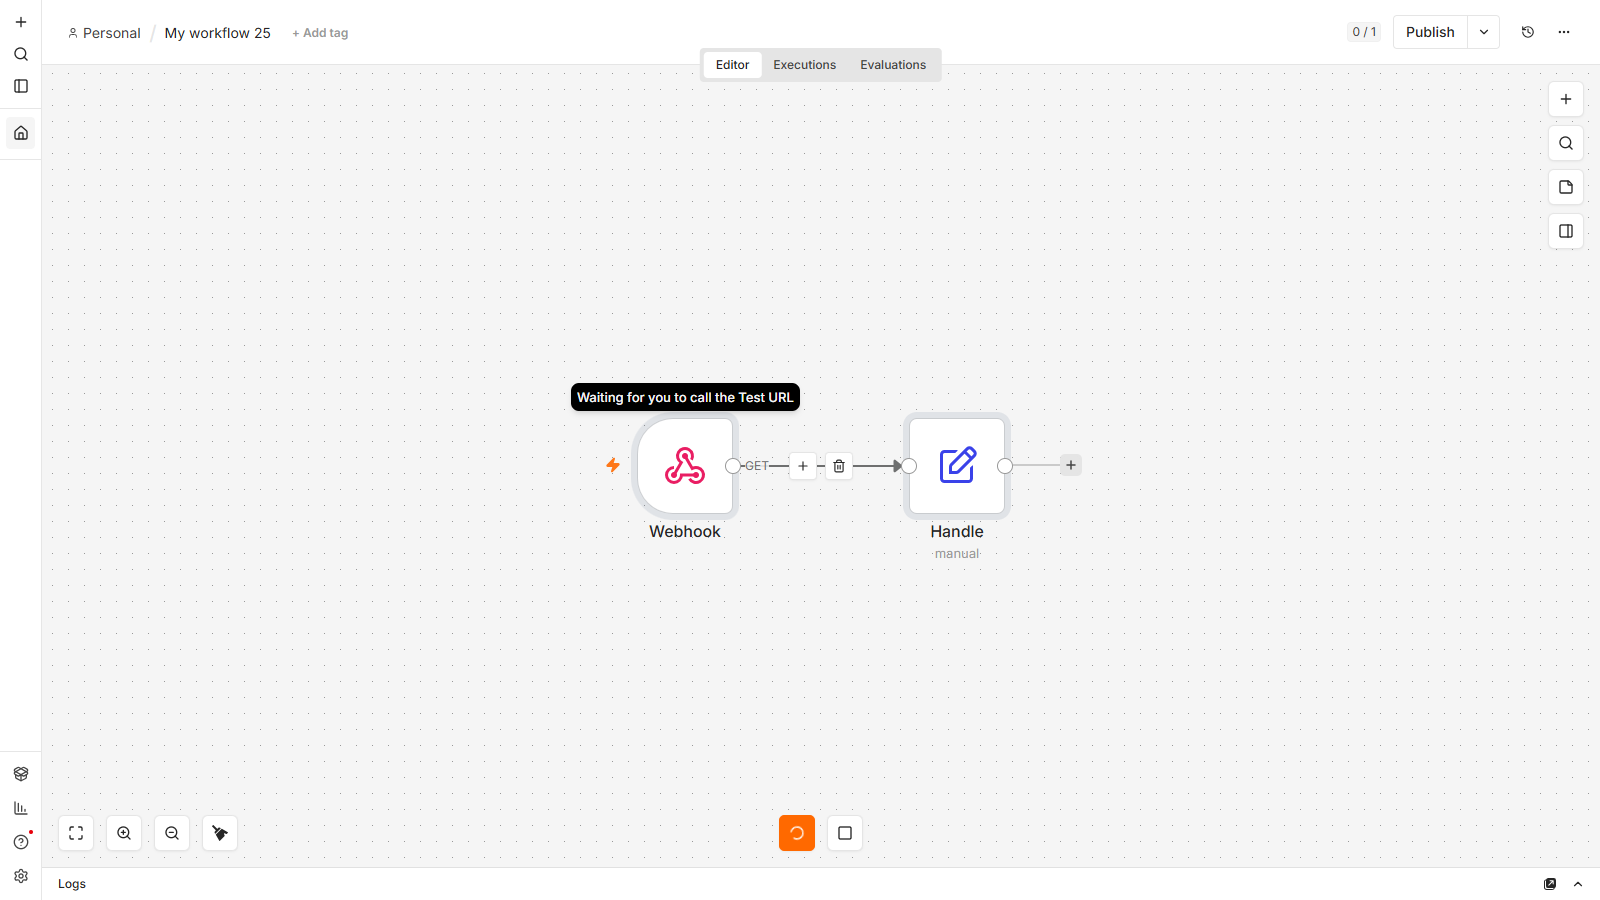
Step 2: Do something with the incoming data
Wire your Webhook to an Edit Fields (Set) node so we can see the data it caught. Any query parameters or body the caller sends show up as {{ $json.query }} (or the specific fields). This is where, in a real automation, you'd save to a sheet, message someone, or call an AI — but for now we just capture what arrived.
Step 3: Test it (the part people get stuck on)
Here's the flow that trips beginners up, so go slow:
- Click Execute workflow (or "Listen for test event"). n8n is now listening on the test URL — it waits for one call.
- Open that test URL in a new browser tab, or call it with a tool like curl:
http://localhost:5678/webhook-test/demo-hook?query=hello - The moment that request lands, your workflow fires — the Webhook node turns green, and you'll see
query: helloflowing through. You just triggered an automation from outside n8n.
To make it permanent, save and activate the workflow — n8n then switches to the production URL, which fires every time, no "listen" step needed.
Where webhooks take you
Once you're comfortable with this, whole categories of automation open up:
- Form to anywhere — a Typeform/Tally submission → your webhook → save to a sheet + email you.
- Payments — Stripe fires your webhook on a sale → send a welcome message + log the customer.
- Chatbots — a messaging platform posts each message to your webhook → your AI replies.
- Website buttons — a button on your site calls the webhook → kicks off any workflow you like.
It's the same doorbell every time — you just change what happens after it rings.
FAQ
What is a webhook in n8n?
A webhook is a trigger node that gives your workflow a unique URL. When any external app or service sends a request to that URL, the workflow runs immediately, using any data included in the request. It's how you let other apps start your automations in real time.
What's the difference between the test and production webhook URLs?
n8n gives each webhook two URLs. The test URL (/webhook-test/...) only works while you've clicked "Listen for test event," and is for building and trying things out. The production URL (/webhook/...) works whenever the workflow is saved and activated, and is the one you give to real apps.
Do I need to pay for webhooks in n8n?
No. On self-hosted n8n, webhook triggers are unlimited and free — there's no cap on executions and no per-call charge. You just need your n8n instance running and reachable at the URL.
Why isn't my webhook firing?
The most common reasons: you didn't click "Listen for test event" before calling the test URL; you're using the test URL after it stopped listening (use the production URL and activate the workflow); or the HTTP method doesn't match (you set the node to POST but visited it with a GET in the browser). Match the method and use the right URL for the situation.
How do I trigger an n8n webhook from another app?
Give the other app your webhook's URL and tell it to send a request there — most apps have a "webhook" or "outgoing webhook" setting where you paste the URL. Whatever data they send arrives in your workflow as {{ $json }} for you to use.
Built and tested on free self-hosted n8n by lalittaparia.online — real no-code AI automation systems, explained simply. Subscribe for the builds that turn these triggers into real income.


